My exam prep continues. I spent a bit of time sitting with class-of-service this weekend and I think I have a good strategy for CoS that I want to share.
Preparation
I’m going to assume that you’re studying how to configure all of the basics of class-of-service for the exam. This post won’t cover much about configuration. You should know how to create custom classifiers, rewrite rules, forwarding-classes, schedulers, and scheduler-maps. You should know how to apply these to your interfaces.
You need to study that. I’m not here to talk about it. Instead, I wanted to discuss a couple of points that are a bit more subtle and strategic in nature that I think I worked out this weekend.
Know your Defaults
If you’re not asked to implement any special forwarding classes, using the default forwarding classes, rewrite-rules, classifiers, and schedulers can be a huge time saver during the exam. The assumption here is that you’re doing some work at the edge to get the traffic marked into the specified forwarding classes. After you have it classified on the first box, you may have some additional work to do to make sure the rest of the network knows how to handle your classifications.
So here’s my big tip: Learn your defaults and be prepared to modify or over-configure them.
So what do I mean by “Learn Your Defaults”? Basically, you need to be able to answer these questions:
- What forwarding-classes exist by default?
- What classifiers and rewrite rules are configured by default?
- What is the difference between classifiers: ipprec-default and ipprec-compatibility?
- What schedulers are configured by default?
- What show commands can I use to look at these if I forget?
Because it’s too lengthy to include here, I’ll just link to an Evernote Shard with a whole bunch of outputs and links to the documentation.
You can augment your bit of memorization work by using “show class-of-service…” commands available. This is good for me because I am lazy but there is another good reason to use the show command output. Because the details of what configuration is default may change as you go from one version of JUNOS to another, (and you may not be practicing on the exact version used on in the exam environment) knowing how to verify the defaults from show command outputs can save you in case of any differences between.
With any luck, the requirements will permit you to apply some default classifiers and rewrite rules to get you carried through your backbone.
Be Ready to Do Some Binary Conversion
You’re gonna need to be able to check your work.
Ping lets you set the ToS bit, which is handy to create DSCP or IP-Precedence marked traffic, but the value has to be specified as a decimal number. This may require math or a calculator or a bit of memorization. If you’re not verifying against IP header code points, you will have to do some temporary config changes with MF classifiers to test your configs. I don’t discuss that in detail here, just the IP ToS verification.
Knowing your basics for how ToS/IPPrec/DSCP are mapped is crucial knowledge here:
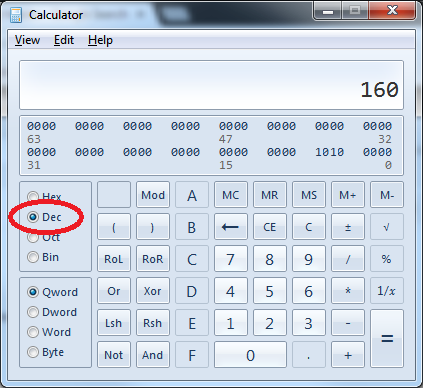
- IP Precedence is a 3-bit value occupying the high order bits of the ToS field in the IP header. You can convert IP precedence to a decimal TOS value by multiplying by 32 (or 2^5) (e.g. 101 == 5 // 5*32 = 160).
- DSCP is a 6-bit value occupying the high order bits of the ToS field in the IP header. Incidentally, this makes it mutually exclusive vs. IP Precendence. You can convert these to a decimal ToS value by converting to decimal and then multiplying by 4 (2^2). My brain is tired just thinking about this, so…
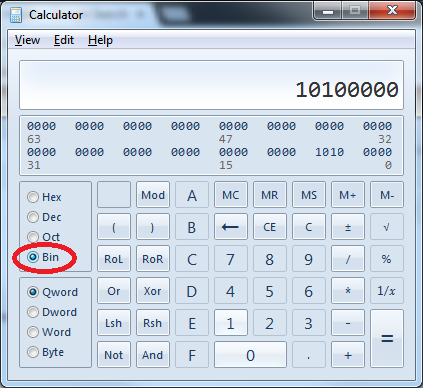
If you don’t want to do math at all, use the “Programmer” mode of the calculator app that comes with Windows to do the conversion. You still need to know that the value occupies the high order bits of an 8-bit field to do this. Pad IPPrec with 5 zeros to the right or DSCP with 2 zeroes to the right and you are good to go. Example follows for IP Precendence value 101:
If you are going to verify with pings, be able to do this conversion quickly.
Exam Strategies
Read the requirements in detail and correlate with any requirements from other sections that may impose restrictions on what methods you may use to achieve these goals.
Classify at the ingress edge. To classify by behavior aggregate code-points, use a classifier. Only use multifield classification if it is required for classification based on other packet characteristics.
If you need to police certain classes based on code-points, you’re already classified and you can simply use “from forwarding class”.
If you have to add a firewall filter, including counters in the filter can be handy for verification.
If possible, use the available “default” forwarding-classes, classifiers, and rewrite rules to your advantage and either over-configure them (meaning, explictly configure defaults) or know how to verify them quickly. Apply these to backbone interfaces. This will be handy if you need forwarding classes to be handled on every router in the backbone.
Verify with pings through to your designated destinations, if you can. Use the calculator to work out ToS values if you need to. Use any firewall counters you have applied and “show interfaces queue” outputs. Test as many traffic classes as you can to verify you have the requirements met.
The Wording Will Get You
Something to watch out for: If the requirements tell you to preserve the “markings” through the network, I suppose you may not be able to achieve that using defaults. I’d ask the proctor on that note.